UPDATED 29 MAY 2012 - Revised several areas for clarity and simplification, and updated formatting.
Things You Should Know About Services
What Is a Service?
Services are applications that continually run behind the scenes. They have no user interface, and don't need a user to be logged in to run. They just run.Why Use a Service?
All applications programmers encounter situations where something needs continuous monitoring, housekeeping, or something needs to happen automatically, when certain conditions or situations arise. For example, connecting a device such as a Pocket PC, Zune HD, iPad, Windows Phone, etc., cause their respective applications to automatically launch and begin synchronizing data.These programs automatically launch, because a service is running in the background that watches for these specific types of devices to be connected. When the connection is detected, the service launches an application. Services can be very simple, such as these, or very complex, such as MS SQL Server and Symantec Anti-Virus.
Services Throw No Exceptions*
(*This is a play on physics, not a fact.)
The worst that happens when a desktop or Web application throws an unhandled exception, the user is presented with a cryptic MessageBox or "yellow screen of death", respectively. When a service throws an unhandled exception, the service stops. That is bad.
Because services have no user interface, messages and errors are typically written to the system log. You may choose to get more detailed information about exceptions, by making the scope of your Try blocks more granular.
Timely Startup
When starting a service, the operating system waits for the successful completion of a synchronous call to the service's OnStart event handler. If the service doesn't report back in a "timely manner" (30 seconds), the operating system assumes it is non-responsive and kills the process. Therefore, the OnStart and OnContinue handlers must either perform quick operations, or initiate an asynchronous process. You can use the Threading namespace, a BackgroundWorker object, or the Async/Await keywords (currently available only through a Community Technology Preview (CTP) release).Debugging is Different
As when writing a library, you can't simply run the application in debug mode. You'll need to create some unit tests. If absolutely necessary, you can always load it up with writes to a log file, to see where bugs pop up. However, the log file approach is cumbersome, requires extra code, and doesn't catch many problems.How to Create a Service Using C# and Visual Studio
Creating a service is very simple. Getting that service to install on a machine is the more complicated part. This section describes the parts of service code. You can skip down to the installation configuration part, if you wish.
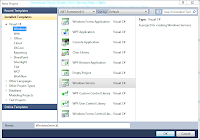 Create a Service Project
This is easy, and is the same process in Visual Studio versions 2005, 2008, and 2010. This demonstration uses Visual Studio 2010.- Launch Visual Studio
- Create a new project
- Select Visual C# > Windows > Windows Service
- Name your project
- Click the OK button
Service Properties
The very first thing to do is set the properties of the service. This is done in the service design mode, that should now be displayed. The most important thing to set is the Name property. Be sure the service name is descriptive, unique, brief, and not ambiguous. You may use spaces in the service name -- in fact, please do use spaces!Other properties are available, including whether the service handles various service events, such as Stop, Pause, Continue, Shutdown, etc. When set to true, these basically subscribe handler methods in your service to the operating system service events.
Anatomy of Service Code
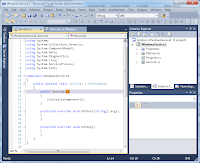
Press the F7 key, to view Service1.cs in code view. Note the following features:- The System.Diagnostics namespace is declared for use, to expose the EventLog class
- The System.ServiceProcess namespace is declared in a using statement
- The Service1 class inherits System.ServiceProcess.ServiceBase
- Override template code for the OnStart event handler is in place
- Override template code for the OnStop event handler is in place
Writing Useful Event Logs
Services are incapable of dealing with unhandled exceptions. A desktop client application displays the exception message in a MessageBox, and Web applications display it in a "yellow screen of death." Services run unattended, and have no user interface. They simply stop, when an unhandled exception is encountered.Therefore, it is necessary to use Try-Catch blocks, and then write the details to the machine's event log. Let's instantiate an EventLog object, and create a class to write exceptions to the log. To make our job of logging easier, the System.ServiceProcess.ServiceBase type, which our class inherits, provides an EventLog object for us. This EventLog instance is configured with the service name, and defaults to the Application log of the local machine.
Classes other than this default service class will likely exist in your service project. To ensure consistency and efficiency, the service's EventLog may be exposed to other classes via constructor arguments. This conveniently aligns with constructor dependency injection, used for unit testing. The service's EventLog instance can not be exposed via static property; because, ServiceBase.EventLog is a property, and properties are attached to instances. Instantiating the service class, simply to access its EventLog property should be discouraged.
Event ID Management
A critically important attribute of event logs in the event identifier (event ID). These values must remain consistent, throughout the lifetime of the service. Never use the same event id for another purpose. Event IDs may only be deprecated, or, simply not used in newer versions of the application. So, how do we easily manage these important event ids?
You generally have two options: create global constants, or use an enumerator. I prefer the enumerator approach; because, it neatly groups all values together, works very well with intellisense, avoids complications associated with ghost const values in referencing modules, and are conveniently typecast to and from Int32. Unless you have all logic in this single service class, place the enumeration in the namespace, instead of inside the service class, for proper visibility to other classes.
internal enum Service1EventIds
{
    Initialization_GeneralFailure = 100,
    Initialization_WatcherDir_NotExist = 101,
    Initialization_WatcherDir_NoAccess = 102,
    Initialization_WatcherDir_OtherError = 103,
    Start_GeneralFailure = 200,
    Start_InitializationFailure = 201,
    Stop_GeneralFailure = 300
}
The Devil is In the (Lack of) Details
The greatest disservice you may do to system administrators, and, ultimately, to yourself, is to provide little to no detail in event logs. This is easily remedied, by providing debug information in the entry.
WARNING: Before choosing to write debug information in your event log, be sure to consult your security professional, to determine if doing so poses a security risk. Don't needlessly expose the inner workings of your service. Providing a switch for writing debug data may be an option.
- Created a new, static class file, named EventLogExtensions.cs
- Create an EventLog extension method, that writes exception details to the log
namespace WindowsService1
{
  public static class EventLogExtensions
  {
    public static void WriteEntry(this EventLog log,
      string message,
      EventLogEntryType type,
      int eventID,
      Exception ex)
    {
      if (String.IsNullOrWhiteSpace(message))
        throw new ArgumentException("message is null or empty.", "message");
      if (ex == null)
        throw new ArgumentNullException("ex", "ex is null.");

      string seperator = new String('-', 50);
      StringBuilder builder = new StringBuilder(message);

      // Write each of the inner exception messages.
      Exception parentException = ex;
      bool isInnerException = false;
      do
      {
        builder.AppendLine();
        builder.AppendLine(seperator);
        if (isInnerException)
          builder.Append("INNER ");
        builder.AppendLine("EXCEPTION DETAILS");
        builder.AppendLine();
        builder.Append("EXCEPTION TYPE:\t");
        builder.AppendLine(parentException.GetType().ToString());
        builder.AppendLine();
        builder.Append("EXCEPTION MESSAGE:\t");
        builder.AppendLine(parentException.Message);
        builder.AppendLine();
        builder.AppendLine("STACK TRACE:");
        builder.AppendLine(parentException.StackTrace);
        if (parentException.InnerException != null)
        {
          parentException = parentException.InnerException;
          isInnerException = true;
        }
      }
      while (parentException != null);

      log.WriteEntry(builder.ToString(), EventLogEntryType.Error, eventID);
    }
  }
}
Now, we are able to catch exceptions and handle them in an unattended environment, from any class and method. The following code in an example of how to implement our EventLogManager class:
protected override void OnStart(string[] args)
{
  try
  {
    throw new Exception("Test parent exception", new Exception("Test inner exception"));
  }
  catch (Exception ex)
  {
    EventLog.WriteEntry(
      "Service failed to start.",
        EventLogEntryType.Error,
        (int)Service1EventIds.Start_InitializationFailure,
        ex);
  }
}
Set Assembly Values
Take a moment to enter information in the assembly attributes. This is important; because, this information is visible to the end user. You want to provide as much information as possible, to tell users what your application does, and to help them locate your files through search interfaces.If you haven't done this before, it is a habit you must quickly adopt. In the Solution Explorer window, expand the Properties node of the Windows Service project. Open the AssemblyInfo.cs file child node. Here's an example of what I entered in this demo code:
using System.Reflection;
using System.Runtime.CompilerServices;
using System.Runtime.InteropServices;

// General Information about an assembly is controlled through the following
// set of attributes. Change these attribute values to modify the information
// associated with an assembly.
[assembly: AssemblyTitle("Windows Demo Service")]
[assembly: AssemblyDescription("This is a demonstration service.  It doesn't do anything useful, and may be uninstalled.")]
[assembly: AssemblyConfiguration("")]
[assembly: AssemblyCompany("The Curly Brace")]
[assembly: AssemblyProduct("Windows Demo Service")]
[assembly: AssemblyCopyright("OPEN SOURCE - Copyright © The Curly Brace 2010-2012")]
[assembly: AssemblyTrademark("")]
[assembly: AssemblyCulture("")]

// Setting ComVisible to false makes the types in this assembly not visible
// to COM components.  If you need to access a type in this assembly from
// COM, set the ComVisible attribute to true on that type.
[assembly: ComVisible(false)]

// The following GUID is for the ID of the typelib if this project is exposed to COM
[assembly: Guid("46733559-4d11-4804-8409-08747ee49221")]

// Version information for an assembly consists of the following four values:
//
//      Major Version
//      Minor Version
//      Build Number
//      Revision
//
// You can specify all the values or you can default the Build and Revision Numbers
// by using the '*' as shown below:
// [assembly: AssemblyVersion("1.0.*")]
[assembly: AssemblyVersion("1.0.0.0")]
[assembly: AssemblyFileVersion("1.0.0.0")]
How to Create a Service Installer Using C# and Visual Studio
After adding functional code to the service, and creating unit tests (you are creating your tests, right?), the service is ready for deployment. However, we can't simply create a setup project, to install a service. A setup project only install the binary files to the machine, and does nothing to install a service.Therefore, the burden of installing the service falls on the service project. The System.Configuration.Install namespace contains objects that expose code to the setup project. This code is executed when the setup runs.
Please note this process uses Visual Studio 2010, which may vary slightly in versions 2008, 2012 and newer. Let's get going, instead of talking about details, here.
Add a Project Installer
The first step is to create a project installer. This is the code that registers the service(s) included in this application with the host operating system. This part is easy, if you know where to look.- Open Service1.cs in design mode
- Make the Properties window visible (press F4)
- Ensure the ServiceName property is set to a unique name
- Ensure other properties are correctly set (i.e. CanPauseAndContinue, etc.)
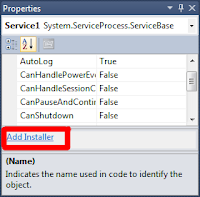
- Click the Add Installer hyperlink, located near the bottom of the Properties window -- a ProjectInstaller.cs file is created and opened in design mode
- In the ProjectInstaller design space, rename the serviceInstaller1 object, to include the name of the class. For example, my example code renames the object to Service1Installer.
If you have multiple service classes in your project, repeat the steps above, for each service class.
Wow, that was easy! We're already half way done with configuring the ProjectInstaller class. Let's take a closer look at the ProjectInstaller design area:
- serviceProcessInstaller1 -- This is the service process installer, which acts as an installer for the individual ServiceInstaller objects
- Service1Installer -- This provides details specific to the Service1 service, which are used to create the service on the host machine
Also, note the class inherits System.Configuration.Install.Installer, which provides many InstallEventHandler methods, such as BeforeInstall, AfterInstall, BeforeRollback, Committed, etc.
Configure Properties
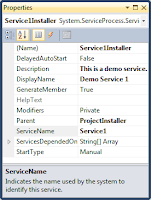
We're half way done with configuring the project installer. To finish, we must configure the service installer objects.- For each ServiceInstaller object in the ProjectInstaller...
- Select the ServiceInstaller object
- Press F4, if the properties window is not already visible
- Enter a description for the Description property
- Enter a user-friendly name for the service for the DisplayName property
- Change the StartType property, if necessary
- Check all other properties, to ensure they are correctly set
Create Installation Actions
During installation of the application, we should to perform some custom actions, including:- Stop existing service (you may be replacing an older version, or repairing the installation)
- Create EventLog event source, if it is missing
- Optionally, start the newly-installed service
Create a new class in the Windows Service project (not in the Setup project), named InstallActions.cs. Add the following code:
using System;
using System.ComponentModel;
using System.Configuration.Install;
using System.Diagnostics;
using System.ServiceProcess;

[RunInstaller(true)]
public class InstallActions : Installer
{
  ServiceController controller;

  public InstallActions()
    : base()
  {
    this.AfterInstall += new InstallEventHandler(InstallActions_AfterInstall);
    this.BeforeInstall += new InstallEventHandler(InstallActions_BeforeInstall);
    this.BeforeUninstall += new InstallEventHandler(InstallActions_BeforeUninstall);
  }

  void InstallActions_BeforeInstall(object sender, InstallEventArgs e)
  {
    // Before installation, stop existing service.
    SetServiceStatus(false);

    // Before installation, create EventLog source, if it is missing.
    if (!EventLog.SourceExists("DemoService1"))
    {
      EventLogInstaller eventLogInstaller = new EventLogInstaller()
      { Source = "DemoService1" };
      Installers.Add(eventLogInstaller);
    }
  }

  void InstallActions_AfterInstall(object sender, InstallEventArgs e)
  {
    // Automatically starting the service after installation is optional.
    SetServiceStatus(true);
  }

  void InstallActions_BeforeUninstall(object sender, InstallEventArgs e)
  {
    // Before uninstalling, stop existing service.
    SetServiceStatus(false);
  }

  //Starts and stops the specified service.
  void SetServiceStatus(bool startService)
  {
    ServiceControllerStatus setStatus =
      startService ? ServiceControllerStatus.Running : ServiceControllerStatus.Stopped;

    try
    {
      controller = new ServiceController("Service1");
      if (controller != null && controller.Status != setStatus)
      {
        if (startService)
          controller.Start();
        else
          controller.Stop();
        controller.WaitForStatus(setStatus, new TimeSpan(0, 0, 30));
      }
    }
    catch {
      // TODO
    }
  }
}
Let's examine parts of this code, to understand what is going on.
- Note the class is decorated with the [RunInstaller(true)] attribute, and inherits System.Configuration.Install.Installer. This is necessary, because we want this code to be included as part of an installation process. This also exposes installation process events, such as BeforeInstall, AfterInstall, Committed, etc.
- public InstallActions() : base() This is the class constructor. It is important to call the base class, which is done by adding " : base()" after the constructor name. The constructor subscribes handler methods to some installation events.
- void SetServiceStatus(bool startService) I created this method, to easily start and stop services. It can easily be modified to accept a service name as an input parameter, or simply iterate through several service names in a collection.
- void InstallActions_BeforeInstall This method is called before installation begins. This is where we ensure all services defined in the ProjectInstaller class are stopped before proceeding with installation. If a service is still running, the installation will fail, on account of the service assembly being in use, and unable to be replaced with the new file.
void InstallActions_AfterInstallThis is called after installation. That is, after files are copied, registry keys are modified, etc., but before the installation is committed. This is when we want to create the event log source(s), using an EventLogInstaller object. We do this after installation, to ensure files and registry keys are successfully created -- we don't want to create event log sources that may not be used.
void InstallActions_CommittedThis is called after all installations, including the EventLogInstaller, are successful and complete. The installation is finished, and no more installations may take place. This is when we want to start the newly installed services.
void InstallActions_BeforeUninstallAs with installing a service, we want to ensure the service is stopped before uninstalling its assembly, otherwise the file system locks the file, and the uninstall fails.
Create a Setup Project
I'm no deployment expert, so I'm not picky about my setup and deployment project types. I don't mind using the good old Visual Studio Installer Setup Project.- Right-click the solution node (topmost node), in the Solution Explorer window -- the context menu appears
- In the context menu, select Add > New Project -- the Add New Project dialog appears
- Select project type (this is the Visual Studio 2010 hierarchy): Other Project Types > Setup and Deployment > Visual Studio Installer
- In the center window pane, select Setup Project
- Name the setup project
- Click the OK button -- the Add New Project dialog closes and the setup project's File System view opens.
Setup Project Configuration
- Add the Service Project output to the application folder -- this identifies the files that are to be copied to the host file system
- If the File System view is not already visible...
- Right-click the setup project in the Solution Explorer window -- the context menu appears
- In the context menu, select View > File System -- the File System view appears
- In the left window pane, select the Application Folder tree node -- the right window pane displays an empty list of files
- Right click in the empty space of the right window pane -- the context menu appears
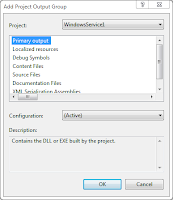
- In the context menu, select Add > Project Output... -- the Add Project Output Group dialog appears
- In the dialog, select the WindowsService1 project, in the Project drop-down box, near the top of the window
- Select the Primary Output option, in the list box, below the Project drop-down box
- Select (Active) in the Configuration drop-down box (this tells the setup project to use the compiled files from the active configuration (debug, release, etc.))
- Click the OK button -- the dialog window closes, and an item appears in the right window pane of the File System view
- Add custom actions
- Right-click the setup project in the Solution Explorer window -- the context menu appears
- In the context menu, select View > Custom Actions -- the Custom Actions view appears, containing four items in the tree node:
- Install
- Commit
- Rollback
- Uninstall
- Add custom actions to the Install action
- Right click the Install tree node, in the Custom Actions view -- the context menu appears
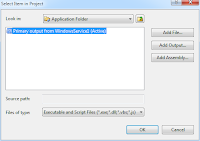
- In the context menu, select Add Custom Action... -- the Select Item in Project dialog appears
- Double-click the Application Folder item in the list box -- the contents of the File System view Application Folder appears in the list box
- Select the Primary output from WindowsService1 (Active) item in the list box (this tells the setup project to look for classes in the output assemblies, decorated with the [RunInstall()] attribute)
- Click the OK button -- the dialog closes, and a child node named Primary output from WindowsService1 (Active) appears below the Install node in the Custom Actions view tree
- Add custom actions to the Commit action by repeating step 3, but using the Commit tree node instead of the Install node
- Add custom actions to the Uninstall action by repeating step 3, but using the Uninstall tree node instead of the Install node
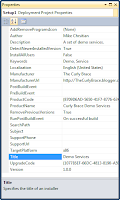
- Configure the setup project properties -- many of these properties appear in the Programs and Features or Add and Remove Programs control panel, providing information about the program to the user (this is important stuff!)
TIP: If you are not sure what the property does, just look at the description pane at the bottom of the properties window (you may need to resize the information pane with the mouse, to make it visible). - Select the setup project in the Solution Explorer window
- If the Properties window is not already visible, press the F4 key -- the Properties window appears
- Enter information in relevant properties -- I recommend setting values for the following for this demo (you want to set as many as possible for real, production releases!):
- Author
- Description
- Keywords -- these are used by search utilities, to help users locate your application
- Manufacturer
- ProductName
- RemovePreviousVersions -- you want to do this for most services
- TargetPlatform
- Title -- this is what appears in the title area of the setup wizard
Test the Setup Project
Ok, let's compile, fire it up, and see what happens!- I suggest selecting the Release configuration
- Click menu items: Build > Rebuild Solution -- all projects in the solution are rebuilt; however, this does not cause the setup project to be compiled!
- Right-click the setup project node, in the Solution Explorer window -- the context menu appears
- In the context menu, select Rebuild -- the setup project is compiled
Use a Virtual Machine for Testing
The setup project is ready to be executed. If you want to execute the setup project on your development workstation (not recommended), simply right-click the setup project in the Solution Explorer window, and then select Install in the context menu.I recommend testing installers on a virtual machine that has virtual the disk image rollback feature enabled. This feature allows you to choose to commit or roll back changes made to the virtual hard drive, since booting the virtual machine. Some virtual machine environments, such as VM Ware, allow you to roll back changes without shutting down the virtual machine, by simply rebooting the virtual machine.
I'm going to use Microsoft Virtual PC; because, it's free and easy to use. Before booting the virtual machine, I enabled the Undo Disks feature, so I can revert back to the machine's previous state.
Notice the service setup wizard displays information from the setup project properties.
To demonstrate that the service is running, I left the exception throwing code in the OnStart event handler of Service1, to write an entry to the system event log. After installation, I launched the Event Viewer and found the following events:
Event Type:     Information
Event Source:   MsiInstaller
Event Category: None
Event ID:       11707
Date:           12/22/2010
Time:           3:52:44 PM
User:           VIRTUALXP-36130\XPMUser
Computer:       VIRTUALXP-36130
Description:
Product: Curly Brace Demo Services -- Installation completed successfully.
[ SNIP ]


Event Type:     Information
Event Source:   Service1
Event Category: None
Event ID:       1234
Date:           12/22/2010
Time:           3:57:52 PM
User:           XPMUser
Computer:       VIRTUALXP-36130
Description:
Service failed to initialize.

--------------------------------------------------
EXCEPTION DETAILS

EXCEPTION TYPE: System.Exception

EXCEPTION MESSAGE:  Test parent exception

STACK TRACE:
(Removed for blog formatting)
--------------------------------------------------
INNER EXCEPTION DETAILS

EXCEPTION TYPE: System.Exception

EXCEPTION MESSAGE:  Test inner exception

STACK TRACE:
(Removed for blog formatting)
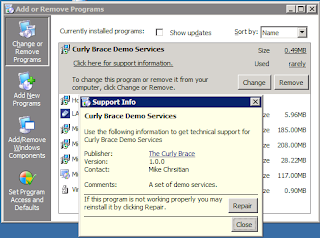
The Add or Remove Programs control panel displays the service application details:
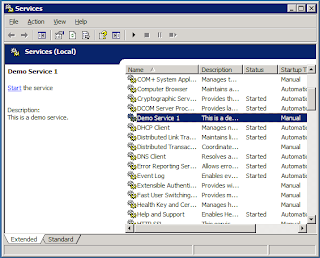
The service also appears in the Services control panel, just like any other service:



Thank you a ton for this post! You instructions are incredibly accurate and exact. I really appreciate this! This really helped me out a ton.
ReplyDeleteThere are a couple of things that I added for my purposes. If you want to write to your own Log File (Not one of the standard ones supplied by MS) then you have to add a line in the "InstallAction_AfterInstall" function. The installer seems to be forcing the EventLog to use the "Application" log. So the first thing I do is issue a:
EventLog.DeleteLogSource("MyLog");
Then, under:
eventLogInstaller.Source = "MyLogApp";
I put,
evenLogInstaller.Log = "MyLog";
This last line is what points the Source at the LogFile of your choice. Originally, I was putting the DeleteLogSource in the Uninstall portion of the InstallActions class, but the Source still always seemed to be register to the "Application" log no matter what I did. This makes me believe that this Log Name info is in the Installer App somewhere and I just can't find it. So my solution was to Hack the Source name out right before the Source is created.
Thanks for the help,
Will
Will;
ReplyDeleteGood observation! I noted there are some errors in my code, and have modified it for accuracy. I'll get it posted, and then let you know when it's there.
Thank you very much. I have years of computing experience but am in the process of learning c# so right now things do seem to be a bit up hill. Your post was like a shining light in helping me with this aspect. The accuracy of your document was simply immense and I hope others find it as useful as I did. Once again, thanks you...
ReplyDeleteTony
Thank you for the kind words, Tony. I looked over this post, after seeing your comment, and decided to update a couple of things. You may want to scan through the post, to see changes.
DeleteI'm new to Windows Service projects (never used before). Please let me know whether I can use a windows service project to do the following scenario.
ReplyDeleteI need to read survey feedback forms from a mail server and save data in a database. Steps: Access Exchange Server > Download PDF attachment and save to a folder > read the PDF > Save those data to database > Move the PDF to archive folder.
PDF document may be around 5 pages. I'm hoping to create a C# windows service project with scheduling to run on daily basis. Is it possible to do above with a indows service?
Thanks,
Chatur
Hello, Chatur:
DeleteYes. Before we get to that, you should know an alternative to using a Windows Service is to configure SharePoint to automatically receive mail and save the attachments to a Document Library. This can save you some time and frustration. Ask Bing or Google how to do this, or read Cameron Dwyer's post, "Five out-of-the-box ways to get Email into SharePoint"
http://camerondwyer.wordpress.com/2012/01/04/five-out-of-the-box-ways-to-get-email-into-sharepoint/
Ok, back to discussing services...
If you are using Microsoft Exchange Server 2007 SP1 or newer, you may leverage the Exchange Web Services (EWS) Managed API.
http://msdn.microsoft.com/en-us/library/exchange/bb408417(v=exchg.80).aspx
http://msdn.microsoft.com/en-us/library/dd633710(EXCHG.80).aspx
http://msdn.microsoft.com/en-us/library/dd637749(EXCHG.80).aspx
If you are using Microsoft Exchange Server 2010, 2013, or newer, you may leverage its SOAP-based Autodiscover service, which may be accessed via EWS 2.0.
http://msdn.microsoft.com/en-us/library/exchange/dd877073(v=exchg.140).aspx
http://msdn.microsoft.com/en-us/library/bb204119(v=exchg.140).aspx
Here a few suggestions that may help:
1. When it's time to deploy a new version of the service, you can minimize downtime by stopping the service, overwrite the old EXE/DLL file(s), and then start the service. Your systems administrator will decide if this fits your company's maintenance, disaster recovery, and best practices.
2. Use a sleeping thread to periodically check for mail. Adjust the sleep time to fit the urgency of getting the attachments. You'll likely be checking anywhere between 10 seconds through 10 minutes.
3. Store the sleep milliseconds value in a configuration file, by using the Project Settings. These settings are stored in an XML file with a .CONFIG extension, deployed along with the .EXE file. To alter the sleep time, edit the .CONFIG file in Notepad, save it, and then restart the service. No need to re-compile or deploy updated binary files.
4. Leverage .NET 4.5 Async/Await keywords, if using the SOAP endpoints. WCF may be a good option, here. There's no reason to avoid using Async, if you are in a position to benefit from this.
5. Install the service to the Exchange server, if possible. This minimizes server back-plane network traffic and response time.
6. Windows Services are very delicate, when it comes to exceptions. PLEASE be sure to write and maintain unit tests. All exceptions must be handled; failure to handle an exception will stop the service! Therefore, be sure to include a LOT of try/catch/finally blocks and a good, static logging class, such as the one demonstrated in this post.
Best of luck on your new adventure! If you have further questions or need some help, feel free to contact me via Twitter, LinkedIn, or reply to this comment.
Hi, im getting error at folowing:
ReplyDeletecatch (Exception ex)
{
EventLog.WriteEntry ( "Service failed to start.",
EventLogEntryType.Error,
(int)Service1EventIds.Start_InitializationFailure,
ex);
}
cannot convert System.Exception to short .
for ex.
Great and that i have a swell provide: How Much House Renovation small home renovations
ReplyDelete